1. Hide Individual Files/Folders On Windows 10 Using the Command Line
A simple way to hide a file or folder is to change its attributes using theattribcommand on the command line. Unsure about using the Windows 10 Command Prompt? Here are our top tips for getting started with the Command Prompt.
Let’s say you want to hide theSample.mp4file in theToHidefolder as shown below.
Open the Command Prompt by pressingWindows key + Rto open theRundialog box. Then, typecmd.exein theOpenbox and clickOK.
At the prompt, type the following command. Replace the path and file name with the path and file name for the file you want to hide.
attrib C:\Users\Lori\Documents\ToHide\Sample.mp4 +s +hThe+sand+hare the attributes you set for the file. The+sattribute is theSystemfile attribute and indicates the file is for use by the operating system and is not normally displayed in a directory listing. The+his theHiddenfile attribute and indicates the file will not be displayed in a directory listing by default.
The attributes in the command are not case sensitive, so you can use either lowercase or uppercase.
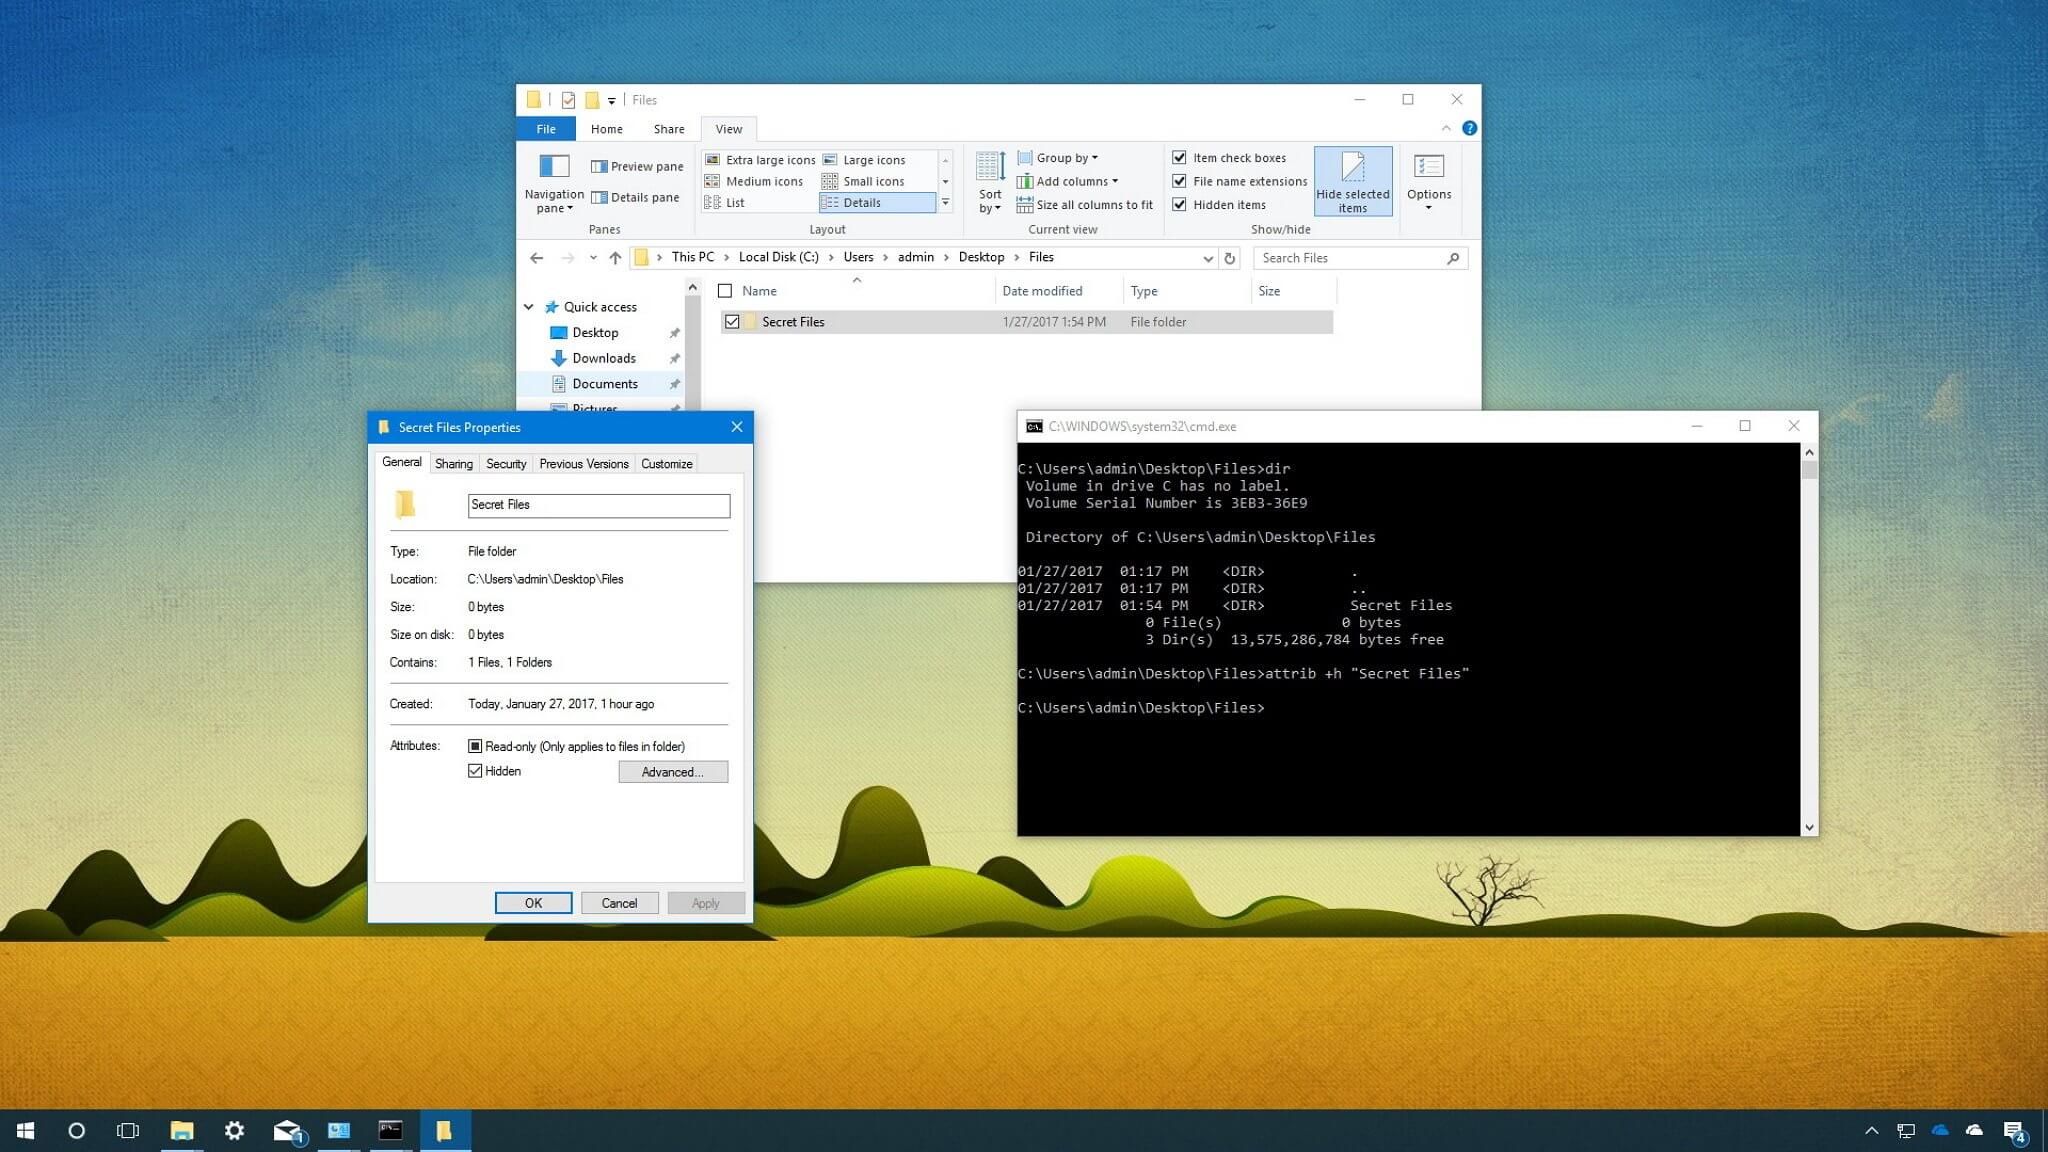
When you open the folder in File Explorer that contains the hidden file or folder, it will not be visible. Even going toView > Show/hideand checking theHidden itemsbox will not show the hidden file or folder.
You can also hide a folder using theattribcommand in the following way. Again, replace the path and the folder name with your own.
attrib C:\Users\Lori\Documents\ToHide\AnotherFolder +s +hTo unhide a file or folder, use the sameattribcommand, replacing the “+” with “–” in front of the “s” and “h” attributes.
attrib C:\Users\Lori\Documents\ToHide\Sample.mp4 -s -hTo learn more about theattribcommand, typeattrib /?at the command prompt and pressEnter.
2. Hide Windows 10 Folders Using File Explorer
Using File Explorer to hide a folder is like using the attrib command described in the previous section, but it’s less secure. Anyone who knows about showing and hiding hidden files in File Explorer can access your files. But if you’re trying to hide data from other family members who are not as tech-savvy as you are, this can work just fine. Hiding files and folders isn’t the only trick the File Explorer has up its sleeve, either. Check out the best File Explorer tricks and tips to take control of your file management.
You can set the Hidden attribute for the selected files or folder in File Explorer. But, first, you need to make sure files and folders with theHiddenattribute do not show in File Explorer. To do this, go toView tab > Optionsand selectChange folder and search options.
On theViewtab, selectDon’t show hidden files, folders, or drivesunderAdvancedsettings and clickOK.
To hide one or more files or folders, select the files or folders, right-click on them, and selectProperties.
On theGeneraltab on thePropertiesdialog box, check theHiddenbox in theAttributessection. To prevent the files or folders from appearing in Windows search results, clickAdvanced.
Then, uncheck the boxes in theFile attributessection of theAdvanced Attributesdialog box and clickOK.
To unhide the files or folder, go back to thePropertiesdialog box for the files or folders in question, and uncheck theHiddenbox in theAttributessection.
3. Hide Entire Drives on Windows 10 Using the Registry Editor
This method hides an entire drive instead of just selected files or folders on the drive.
Note:This procedure involves changing the registry. Before you begin, I strongly suggest you back up your registry. You should also check out our tips for not accidentally messing up the Windows registry.
If you’re not comfortable using the Windows registry or are unsure as to what the Windows Registry even is, you can find another method for hiding an entire drive in theHide Entire Drives Using the Disk Management Utilitysection below.
To begin, open the Registry Editor by pressingWindows key+Rto open theRundialog box. Then, typeregeditin theOpenbox and clickOK.
Navigate to the following key in the left pane.
HKEY_LOCAL_MACHINE\Software\Microsoft\Windows\CurrentVersion\Policies\ExplorerRight-click on theExplorerkey and go toNew > DWORD (32-bit) Value.
Name the new valueNoDrivesand then double-click on it.
On theEdit DWORD (32-bit) Valuedialog box, selectDecimalas theBase. Then, enter a number that corresponds to the drive or drives, you want to hide. To find out which number to use, see the table below the following image.
Find the letter for the drive you want to hide in the table below. Enter the number associated with that drive letter in theValue databox for theNoDrivesvalue in the registry. In our example, I entered64to hide myG:drive.
If you want to hide more than one drive, add the numbers for all the drive letters you want to hide and enter the total in theValue databox.
After you restart your computer, you will not see the drive in File Explorer.
To show the drive again, go back into the Registry Editor and delete theNoDrivesvalue under theHKEY_LOCAL_MACHINE\Software\Microsoft\Windows\CurrentVersion\Policies\Explorerkey and restart your computer again.